We may earn money or products from the companies mentioned in this post.
Supplies List:
- Princeton Snap Brushes (size 6 and 2)
- Windsor and Newton Watercolor Paint
- Watercolor Paper (140 lb. Cold-press Paper)
- Water
- Paper Towel
Paint Colors Used:
- Burnt Sienna
- Cadmium Orange
- Alizarin Crimson
- Yellow Ochre
- Black
- Sap Green
I’m going to switch over to some Burnt Sienna on my brush. I will also be using a light wash. I’m not cleaning my brush at all, I’m just going straight into the Burnt Sienna. Add the Burnt Sienna color to this while the Cadmium Orange paint is still wet.

I’m going to get some water on my brush and tap off any extra to lighten my Burnt Sienna up a bit. Then I’m going to keep tapping out the shape of my tree.
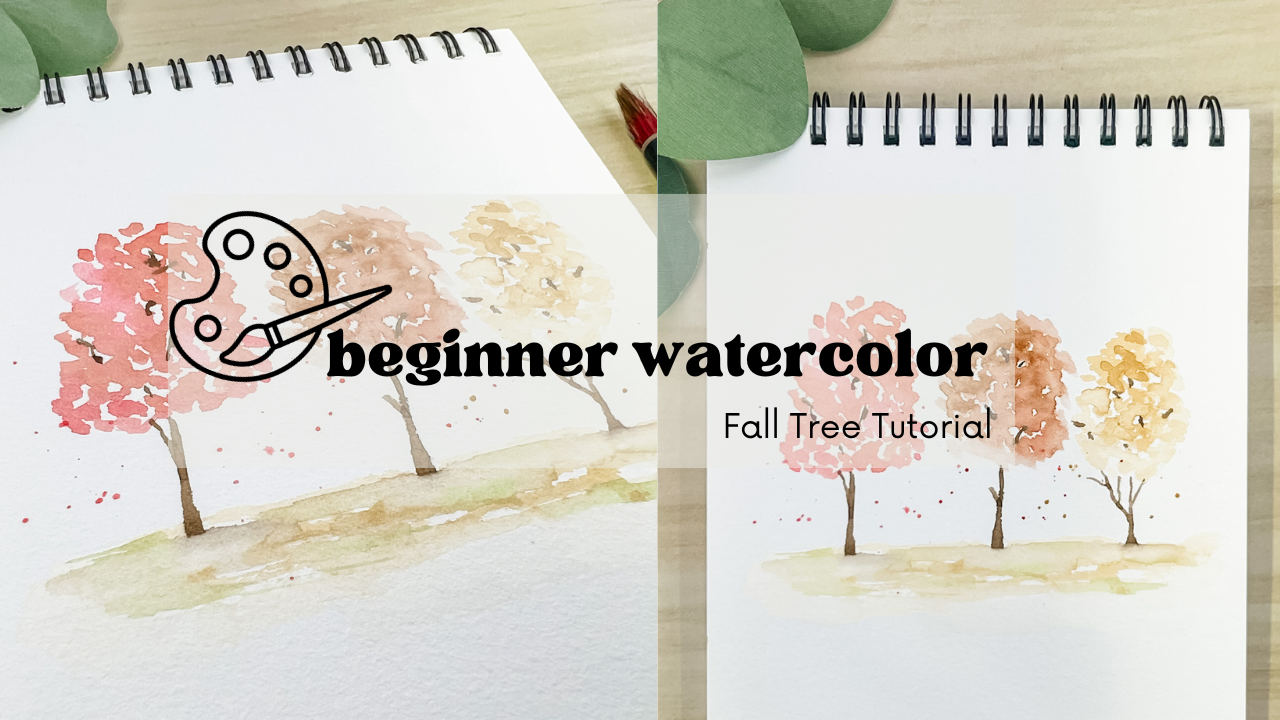
Sometimes it can help if you look at a reference photo of the shape of a tree. But if you can’t if you do an oval or circle shape you’ll be good. Leave a lot of those little white/negative spaces in between you your paint splotches. That’s really going to give the appearance of the leaves rather than it being solid.
I’m going to rinse my brush off a little bit to where there is still some yellow paint on my brush. Then I’m going to fill out the rest of my tree shape with this lighter paint color.
Next, I am going to rinse my brush out and get a decent amount of Alizarin Crimson paint on my brush, and then begin painting in our third and final tree.
This time I am going to have the Alizarin Crimson paint be place from the top left of the tree to the bottom left of the tree. Then I am going to take my Cadmium Orange paint (without cleaning my brush) and fill in the rest of the tree.

Now, that I have my last tree top painted, I am going to go back and add touches of darker paint values to the trees. This step is optional if you feel like your trees have enough depth from the first step.
The next step we need to do with out painting is add some tree trunks to these trees.
Use your Burnt Sienna and Black paint to mix together a rich brown paint color.
Once you have a thick brown paint mixture, use the tip of your brush to paint in a THIN tree trunk (you can always go bigger later). Then add tiny little stems throughout the white space in the tree tops. You can also add little tree branches along side the trunks of the trees if you want. This time you can have fun making each tree seem a little different. Remember keep your tree trunk and branches thin, it’ll make all the difference in the world!

Now we are going to add a ground beneath our trees, by going back into our Yellow Ochre paint and loosely painting in the ground. Leave some random areas of white space to all for a loose and highlighted area.
Then while everything is still damp, grab a little bit of your brown paint on the tip of your brush and add a small shadow area under each tree trunk.
Lastly, for the ground take a small amount of the Sap Green paint and tap in the green color on the ground to give some depth.

Lastly, to finish off the entire painting, we are going to splatter paint under each tree to give the appearance of falling leaves. Use the main color of each tree to splatter the paint under the trees and you are done!

I hope you enjoyed today’s tutorial! If you did, please sign up for our FREE email list, where you will be notified every time a new tutorial comes out.