
We may earn money or products from the companies mentioned in this post.
Need Some Painting Inspiration?
If you are looking for some painting inspiration or if you’re asking yourself what should I paint? Then look no further. I always fall back to sunsets when I don’t know what to paint. Every sunset I paint is made up of a variegated wash. Once you get the hang of them, you can create so many amazing color combinations. If you’ve never created a variegated wash or don’t know what it is, check out, Watercolor Wash Techniques.
Now that we have an idea of what to paint, let’s talk about what we are going to create today. We are going to paint an EASY watercolor forest sunset. I will walk you step-by-step on how to create this painting. So, let’s get to it!

What supplies will you need?
Supply List:
- Watercolor paper
- Round paintbrush
- Flat paintbrush
- Watercolor paint (ultramarine, cadmium yellow, winsor violet, alizarin crimson, & ivory black)
- Washi/Painters tape
- Two cups of water
- Paper towel
If you would like to see all the art supplies I recommend, check out, “My Supplies” page. Click HERE to check it out!
Let’s Mix Our Paint!
Before we begin painting we need to get our paint ready and into our mixing pallet.
- Create a thick wash of Ultramarine in your pallet. Use less water then paint to create a thick blue paint mixture.
- Create a wash of Cadmium Yellow in your pallet. Use an even amount of water then paint to create a yellow paint mixture.
- Create a wash of Alizarin Crimson in your pallet. Use an even amount of water then paint to create a red paint mixture.
- Create a wash of Winsor Violet in your pallet. Use an even amount of water then paint to create a purple paint mixture.
- Create a thick wash of Black Ivory in your pallet. Use less water than paint to create a thick black paint mixture.

Let’s Paint!
Step 1:
Grab your watercolor paper and tape it down to your desk or any flat surface. This will help your paper not to wave as much, and it will also create a clean border around your painting when it’s all finished. One of the best parts about using painters tape is peeling off at the end and seeing your completed masterpiece.
Step 2:
To create our first layer we are going to work quickly. Take your flat paintbrush and dip it into your blue paint mixture. Paint in two lines across the top of the canvas.
While your paint is still wet, dip your flat paintbrush into your purple paint mixture and begin painting in the purple paint angling down from the top left of the canvas to the bottom of where you ending the blue paint mixture.
Again, while your painting is wet, dip your flat paintbrush into the red paint mixture and paint in two lines under the blue and purple paint.
Before everything dries, dip your flat brush into the yellow paint mixture, blend it with the red and paint, and then paint in the rest of the canvas with the yellow paint.
Wait for this to completely dry before moving on to step 3.

Step 3:
For step three we are going to use our flat paintbrush and our round paintbrush. We’ll start with the round paintbrush, by dipping it into the yellow paint mixture. Now, begin painting in the lightest mountain outline. I used a lot of curving shaped to create my mountain peaks. Create different sizes as you paint across your canvas to give the mountain texture. While the paint is still wet, dip your flat brush into the yellow paint mixture and fill in the rest of the canvas with the yellow paint mixture.
Wait for this layer to completely dry before moving on to step 4.

Step 4:
We are going to use the flat brush and the round brush again. Dip your round brush into the thick blue paint mixture and begin painting in the outline for our second mountain layer. Use curving shapes staggering the different sizes as you paint across the canvas. Now grab your flat brush and fill in the rest of the canvas with the thick blue paint.
Wait for this layer to completely dry before moving on.

Step 5:
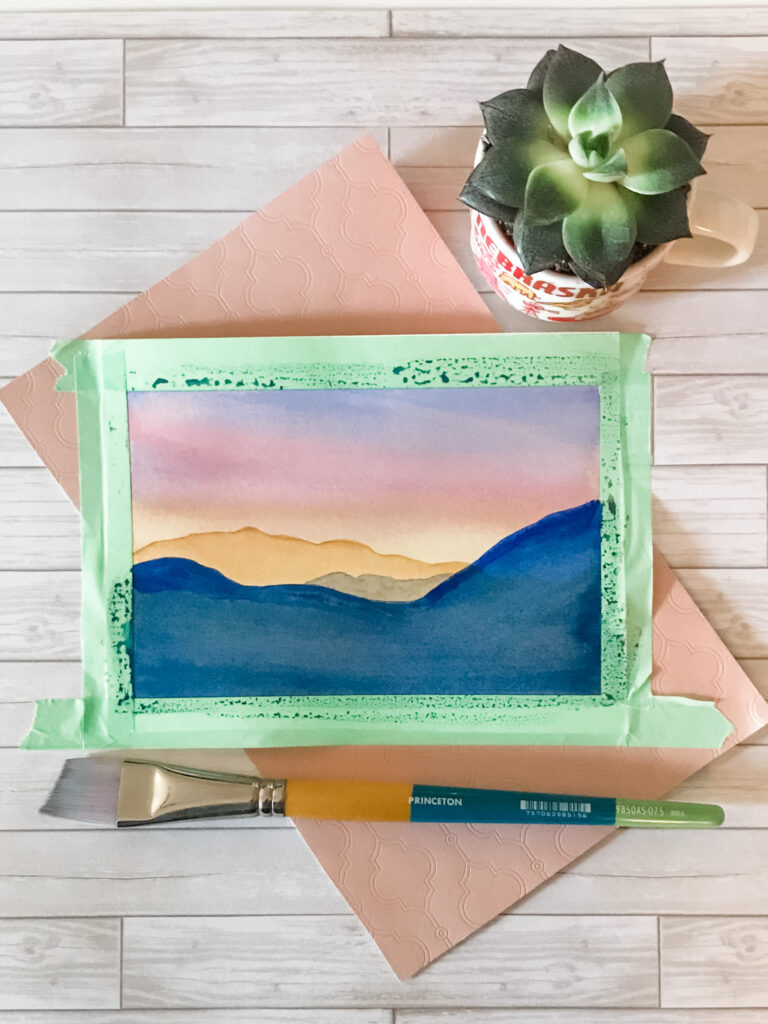
This step will be pretty quick and easy. First, add a lot of water to your thick blue paint mixture, to make it more transparent. We are going to use this paint mixture to make it seem like we painted this mountain a step earlier. Once your paint is diluted and you’ve tested it on your paper towel or scratch piece of paper, dip your round brush in. Begin painting a small mountain peak outline in the center of the previous mountain layer we created. Use the picture below as a guide.
Step 6:
We are finally at the point where we can paint in our forest! This step is really going to finish off our painting and make it stand out. Dip your small round brush into the thick black paint mixture and paint in four straight lines where you want your four tallest trees to be. Make each line a different size to create more texture in the painting.
How to fill in the trees. Starting at the top of the tree, use your small detail brush to create short lines coming off the tree trunk slightly angling upwards.
Once the four tallest trees are complete we are going to fill in the rest of the space with smaller trees. Paint in shorter lines where you’d like the smaller trees to go than using the directions above fill in each tree trunk.
You’re Done!

I hope you found some painting inspiration today. Before you go, don’t forget to follow along on Instagram, Twitter, Facebook, and Pinterest to see even more behind the scenes! If you don’t want to miss out on any new tutorials sign up for our completely FREE newsletter, where you will receive a FREE color wheel cheat sheet.. Comment below letting me know what you’d like to create next, whether it be a painting or a DIY idea!
If you are an artist like me and would like to share your own ideas on your own blog, check out Blogging Blastoff. This is a full 4-week course that’ll teach you exactly how to set up a successful blog that makes money. But if you aren’t ready to purchase a full course, check out this FREE blogging course, Start A Blogging Business 5 Day Course, it will get you started on the right path in just a week.
Oh how beautiful. I’m going to have to try this!
Nice tutorial! Pretty water color creation!
I love all your tutorials! If you ever offer an online class I would love to join in. You make it look so easy but I do better watching!
Beautiful! I have found painting (even though I’m not very good at it) to be so therapeutic. I want to sit down with my kids and do this.
Very pretty! And it doesn’t look overly complicated with the tutorial.
Well you make this look so easy! I’d love to try but not sure mine would turn out like quite the piece of art yours did ☺️
Love how simple this tutorial is to follow! Beautiful final product. Thanks!
This is so pretty! Love all the colors!
I just sent this to my friends!
You make it look so easy. I love your results.
Such simple instructions – looks like a great weekend activity for the family!
I love all of your beautiful pieces of art!!! What talent!!
What fun to experiment with the colors to make each painting unique.
Love the way sunsets looks with watercolors. I have all the tools for this. I need to try it!
The final product is gorgeous and this is a great tutorial! It’s inspired me to get my art supplies back out.
I love taping off the frame, I presents such a finished look. Thanks for sharing.
Wow this is breath taking!
You make it look so easy. Another beautiful tutorial.
I really enjoy your watercolor tutorials – I hope to try one of these with my kids.
Your watercolors and the way you demonstrate your methods is just great; thank you!
You are so talented and patient with the step by step demonstrations!
Very pretty and another perfect fall project!
Beautiful, as always. Love your creativity!